Kubernetes: Evenly Distribution of Pods Across Cluster Nodes
Posted on March 5, 2022
Managing Pods distribution across a cluster is hard. Pod affinity and anti-affinity feature of Kubernetes allows some control of Pod placement. However, these features only resolve part of Pods distribution use cases.
There is a common need to distribute the Pods evenly across the cluster for high availability and efficient cluster resource utilization.
As such, PodTopologySpread scheduling plugin was designed to fill that gap. The plugin has reached a stable state since Kubernetes v1.19.

In this blog post, you’ll learn how to use the topology spread constraints feature of Kubernetes to distribute the Pods workload across the cluster nodes in an absolute even manner.

Step 1. Spin Multi-node Kubernetes Cluster
If you already have a Kubernetes cluster with three or more worker nodes, you can skip this cluster setup part and move to Step 2
We’ll be using an awesome tool called kind to spin up a local Kubernetes cluster using Docker containers as “nodes”.
By default, when creating a multi-node cluster via kind, it doesn’t assign a unique hostname for each worker node.
Firstly, create a directory called hostnames containing a file for each worker with a unique hostname.
$ mkdir hostnames
$ echo 'worker-1' > hostnames/worker-1
$ echo 'worker-2' > hostnames/worker-2
$ echo 'worker-3' > hostnames/worker-3
Now, save the kind cluster config shown below which creates a Kubernetes cluster consisting of 1 control panel (master) and 3 workers. The config also has mounts defined per worker to set the unique hostname.
$ cat > unkind-config.yaml <<EOF
kind: Cluster
apiVersion: kind.x-k8s.io/v1alpha4
nodes:
  - role: control-plane
  - role: worker
    extraMounts:
    - hostPath: hostnames/worker-1
      containerPath: /etc/hostname
  - role: worker
    extraMounts:
    - hostPath: hostnames/worker-2
      containerPath: /etc/hostname
  - role: worker
    extraMounts:
    - hostPath: hostnames/worker-3
      containerPath: /etc/hostname
EOF
Finally, spin up a Kubernetes cluster as such:
$ kind create cluster --config unkind-config.yamlThe output should be similar to shown below:
Creating cluster "kind" ...
 ✓ Ensuring node image (kindest/node:v1.21.1) 🖼
 ✓ Preparing nodes 📦 📦 📦 📦
 ✓ Writing configuration 📜
 ✓ Starting control-plane 🕹️
 ✓ Installing CNI 🔌
 ✓ Installing StorageClass 💾
 ✓ Joining worker nodes 🚜
Set kubectl context to "kind-kind"
You can now use your cluster with:
kubectl cluster-info --context kind-kind
Thanks for using kind! 😊
Now, verify the cluster is up and running:
$ kubectl get nodes
NAME                 STATUS   ROLES                  AGE     VERSION
kind-control-plane   Ready    control-plane,master   3m29s   v1.21.1
worker-1             Ready    <none>                 2m58s   v1.21.1
worker-2             Ready    <none>                 2m58s   v1.21.1
worker-3             Ready    <none>                 2m58s   v1.21.1
We’re now ready to play around with the cluster!
Step 2. Distribute Pods Evenly Across The Cluster
The topology spread constraints rely on node labels to identify the topology domain(s) that each worker Node is in.
In order to distribute pods evenly across all cluster worker nodes in an absolute even manner, we can use the well-known node label called kubernetes.io/hostname as a topology domain, which ensures each worker node is in its own topology domain.
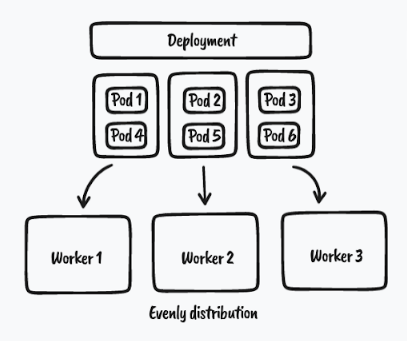
In the below manifest, we have defined a deployment with 3 replicas that assigned a label type=dummy to the Pod and a topologySpreadConstaints that acts on pods that have that label defined. Pod runs a container image called pause which does nothing for demo purposes.
apiVersion: v1
kind: Namespace
metadata:
  name: dummy
---
apiVersion: apps/v1
kind: Deployment
metadata:
  name: dummy
  namespace: dummy
spec:
  replicas: 3
  selector:
    matchLabels:
      type: dummy
  template:
    metadata:
      labels:
        type: dummy
    spec:
      topologySpreadConstraints:
        - maxSkew: 1
          topologyKey: kubernetes.io/hostname
          whenUnsatisfiable: ScheduleAnyway
          labelSelector:
            matchLabels:
              type: dummy
      containers:
      - name: pause
        image: k8s.gcr.io/pause:3.1
Besides the usual deployment specification, we have additionally defined topologySpreadConstaints as such:
- maxSkew: 1 — distribute pods in an absolute even manner
- topologyKey: kubernetes.io/hostname —use the hostname as topology domain
- whenUnsatisfiable: ScheduleAnyway — always schedule pods even if it can’t satisfy even distribution of pods
- labelSelector —only act on Pods that match this selector
Now, save and apply the manifest:
$ kubectl apply -f dummy-deployment.yaml
namespace/dummy created
deployment.apps/dummy created
and verify that the pod’s placement is balanced across all worker nodes:

As we can see from the above screenshot, pods are scheduled evenly on worker-1, worker-2, and worker-3 respectively.
We can further upscale the deployment to 30 replicas, and validate the even distribution of pods as we scale.
$ kubectl -n dummy scale deploy/dummy --replicas 30As you can see from the screenshot below. Pods are evenly distributed across all cluster nodes after we upscaled the deployment.

Conclusion
PodTopologySpread scheduling plugin gives power to Kubernetes administrators to achieve high availability of applications as well as efficient utilization of cluster resources.
Known Limitations:
- Scaling down a Deployment will not guarantee and may result in imbalanced Pods distribution. You can use Descheduler to rebalance the Pods distribution.

